
以前の記事で arXivから論文のアブストラクトを取得し、WordCloudを作成するという記事を書きました!
そこでは、論文の全文を取得することができなかったことからアブストラクトからのWordCloud作成となりましたが、アブストラクトだけでは文字数が十分でありません。そこで、今回の記事では PDFを全文読み込むことができる"PyMuPDF" と組み合わせることにより、「論文全文のWordCloudを作成」に挑戦します!

arXiv 論文を取得し 全文のWordCloud作成
今回用いるライブラリ・API
arxiv API
arXiv から論文情報の取得, PDFのダウンロードを行う
pip install arxiv arXiv APIについて知りたい方はこちらから!
(今回用いる手法とは、少し異なる手法を使っていますが共通する部分もあります)

PyMuPDF
python で PDF を読み書きできるライブラリ
pip install pymupdf
Texthero
簡単にWordCloudを使うことができるライブラリ
pip install texthero
arXiv API で 最新論文を取得
まず arXiv API を用いて論文情報を取得します
- query : 論文のカテゴリを設定 (今回は CS.AI : コンピュータサイエンスの AIカテゴリ)
- max_results : 取得する最大論文数
- sort_by : ソートの設定 (arxiv.SortCriterion.SubmittedDate は 提出日順)
サンプルコード
今回の例では、CS.AIというカテゴリの論文から 最新のもの 10件を取得します
import arxiv
search = arxiv.Search(
  query = "CS.AI",
  max_results = 10,
  sort_by = arxiv.SortCriterion.SubmittedDate
)
arXiv API で論文をダウンロード
arXivAPIでは、pdfのダウンロードもすることができます!
具体例としては、下のサンプルコードの通りで上で取得した論文情報を元に一つずつdownloadしていきます。
- dir_path : PDFをダウンロードし保存する ディレクトリのパス指定 (この引数はなくても良い)
サンプルコード
import arxiv
for result in search.results():
    pdf_file_path = result.download_pdf(dirpath="./pdf")
PyMuPDFで 全文読み込む
PyMuPDFを用いて、1ページずつ読み込んでいきます。(改行文字である \n も 紛れてしまうので、ここで削除)
import fitz
with fitz.open(pdf_file_path) as pdf_in:
 text = ""
  for page in pdf_in:
   page1 = page.get_text()
    page1 = page1.replace('-\n','').replace('\n','')
    text = text + page1
PyMuPDFの使い方については、こちらから
実際に使ってみる 実践例はこの記事から

texthero で WordCloudを作成
前処理
ここまでで読み込んだ論文の全文は、textですがノイズが入っているので、前処理が必要です。
例えば、下のような引用番号のついた [12,13,14]は削除したいですよね
これらのテキストの前処理をhero.cleanで行います
hand-crafted engineering [12,13,14]
サンプルコード
論文全文 text を前処理して clean_text にします
import pandas as pd
import texthero as hero

s = pd.Series(text)
clean_text = hero.clean(s, pipeline=[
    hero.preprocessing.fillna,
    hero.preprocessing.lowercase,
    hero.preprocessing.remove_digits,
    hero.preprocessing.remove_punctuation,
    hero.preprocessing.remove_diacritics,
    hero.preprocessing.remove_stopwords,
    hero.preprocessing.remove_whitespace
])
追加の前処理
ここまでの前処理でもテキストはきれいになっているのですが、実際に試してみると 英文字一文字のような x, n などのよく使う文字が含まれているときがありました。これらの文字を強調して抽出したいわけではないので、英文字一文字などを除去するコードを加えます
サンプルコード
    from texthero import stopwords
    default_stopwords = stopwords.DEFAULT
    single_alphabet = ["a","b","c","d","e","f","g","h","i","j","k","l","m","n","o","p","q","r","s","t","u","v","w","x","y","z","'"]
    single_alphabet_large = ["A","B","C","D","E","F","G","H","I","J","K","L","M","N","O","P","Q","R","S","T","U","V","W","X","Y","Z"]
    single_alphabet += single_alphabet_large
    symbols = ['"','-',"*","<", ">"]
    custom_stopwords = default_stopwords.union(set(single_alphabet)).union(set(symbols))
    clean_text = hero.remove_stopwords(clean_text, custom_stopwords)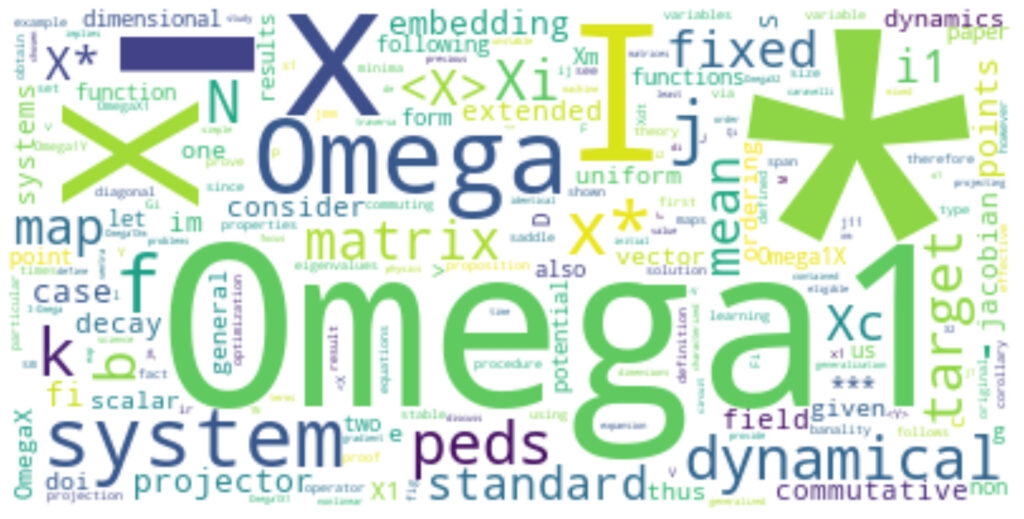
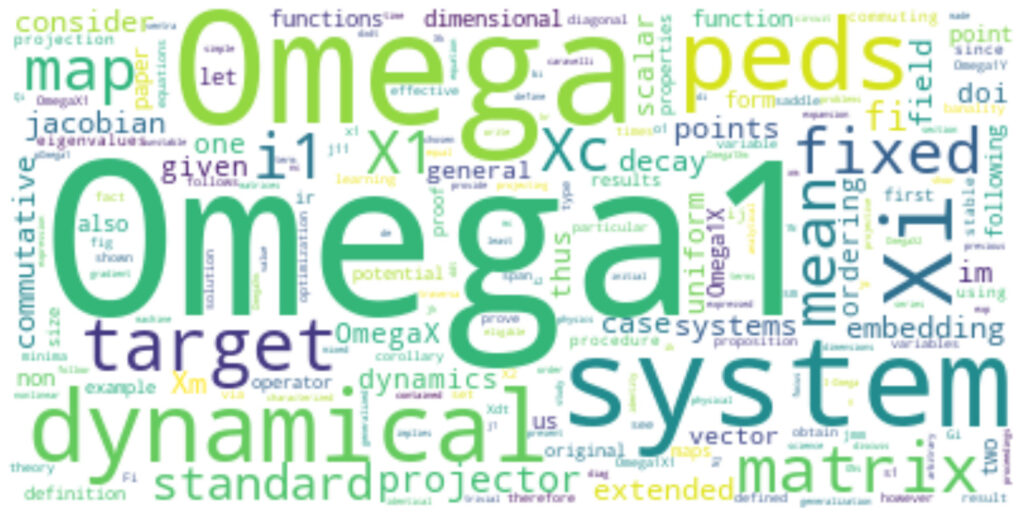
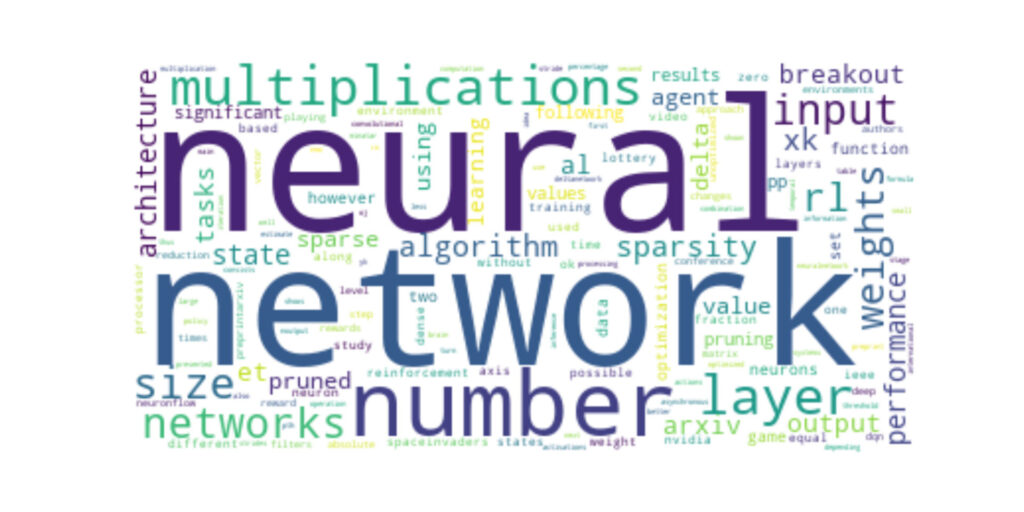
wordcloud の生成 と 画像保存
ここの例では、 wordcloudを生成し wordcloud ディレクトリ下に保存するような設定にしてあります!
実際にコードを動かして WordCloud の画像が保存されることを確かめてみてください!
hero_img = hero.visualization.wordcloud(clean_text, colormap='viridis',background_color='white',return_figure=True)
hero_img.savefig("wordcloud/{}.png".format(pdf_file_path.replace('./pdf\\','')))
実際に表示してみると、このような図ができあがります!!
サンプルコード(全文)
最後に、ここまでのコードをまとめると以下のコードのようになります!
実際に試してみてください!
import arxiv
import fitz
import pandas as pd
import texthero as hero
from texthero import stopwords

search = arxiv.Search(
  query = "CS.NE",
  max_results = 10,
  sort_by = arxiv.SortCriterion.SubmittedDate
)

for result in search.results():
    print(result.title)
    pdf_file_path = result.download_pdf(dirpath="./pdf")

    with fitz.open(pdf_file_path) as pdf_in:
        text = ""
        for page in pdf_in:
            page1 = page.get_text()
            page1 = page1.replace('-\n','').replace('\n','')
            text = text + page1

    s = pd.Series(text)
    clean_text = hero.clean(s, pipeline=[
        hero.preprocessing.fillna,
        hero.preprocessing.lowercase,
        hero.preprocessing.remove_digits,
        hero.preprocessing.remove_punctuation,
        hero.preprocessing.remove_diacritics,
        hero.preprocessing.remove_stopwords,
        hero.preprocessing.remove_whitespace
    ])


    default_stopwords = stopwords.DEFAULT
    single_alphabet = ["a","b","c","d","e","f","g","h","i","j","k","l","m","n","o","p","q","r","s","t","u","v","w","x","y","z","'"]
    single_alphabet_large = ["A","B","C","D","E","F","G","H","I","J","K","L","M","N","O","P","Q","R","S","T","U","V","W","X","Y","Z"]
    single_alphabet += single_alphabet_large
    symbols = ['"','-',"*","<", ">"]
    custom_stopwords = default_stopwords.union(set(single_alphabet)).union(set(symbols))
    clean_text = hero.remove_stopwords(clean_text, custom_stopwords)


    hero_img = hero.visualization.wordcloud(clean_text, colormap='viridis',background_color='white',return_figure=True)
    hero_img.savefig("wordcloud/{}.png".format(pdf_file_path.replace('./pdf\\','')))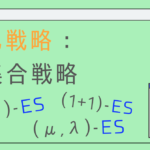

コメント